How to Create Custom Shortcode in WordPress

What is WordPress Shortcode?

Shortcode is a tiny code within “[]”. It lets you show some pre-defined, pre-coded function like a gallery, contact form or some text in post or page body. Even in themes core files. Example, [galleri] [contactform] etc. Since the WordPress 2.5 update, It supports shortcode. The Shortcode API makes it easy to create shortcodes.

How to create custom shortcode in wordpress?

Now it is time to create a shortcode. Here I will show a simple shortcode tutorial. Later, you can extend it with your coding skill.

function mwp_intro($atts){
	return'This is a simple text';
}

add_shortcode('mwp','mwp_intro');

Now add [mwp] anywhere you want to show in post or page.

If you want to show the shortcode in a PHP file. Like if you want to show this shortcode in sidebar.php or footer.php or else, then just add these code.

echo do_shortcode( '[mwp]' );

create custom shortcode in wordpress

Code explanation

In the “mwp_intro” function, you can add PHP codes, HTML, TEXT anything. To learn more, you can check on Shortcode API.

Now, the add_shortcode function will return what you add in the function. In add_shortcode function, the first parameter tells WordPress to create a new shortcode and the second parameter is a callback that hooks to run when the shortcode is found.

Conclusion

In this above tutorial, I have worked with a very easy shortcode. You can write complex function, attributes even you can pass arguments. If you are bothered to create shortcode manually, look for shortcode plugins in WordPress repository.

build-wordpress-widget

How to Build a Custom WordPress Widget

WordPress Widget is a super user-friendly drag and drop tools that it can let you add elements anywhere in the site. The elements could be simple text editor or PHP made custom widgets that have various functions like social share button, contact form etc. The question is where to add a widget? Before dropping the widget elements, you need to register sidebar first. WordPress register_sidebar function will let you create sidebars. Now it’s time to create WordPress widget. See below articles.

How to Build a Custom WordPress Widget step by step

You can execute codes in functions.php if it is not complex. Otherwise, make a plugin (see how to make plugins here) or write codes in themes library in a folder that can be called from the functions.php. If you are a PRO, then it will be so easy for you. Here I will add codes in functions.php

First, add these codes in functions.php then later I will explain codes.


class mwp_wid extends WP_Widget{
	
	function mwp_wid(){
		parent::WP_Widget(false, $name = "MWP Test Widgets");
	}
	
	function form($instance){
		
		
		$name = esc_attr($instance['name']);
		?>
		
	    <p>

        <label for="<?php echo $this->get_field_id('name'); ?>"><?php _e('Your Name:'); ?></label>

        <input id="<?php echo $this->get_field_id('name'); ?>" name="<?php echo $this->get_field_name('name'); ?>" type="text" value="<?php echo $name; ?>" />

	    </p> 
		
		<?php
		
	}
	
	function update($new_instance,$old_instance){
		
		$instance = $old_instance;
		$instance['name'] = strip_tags($new_instance['name']);
		
		return $instance;
	}
	
	function widget($args, $instance) {
		
			extract( $args );

			// these are the widget options
			$name = $instance['name'];
			
			
			echo $before_widget;

			
			// Check if options are set
			
			if( $name ) {
				echo '<p class="wp_widget_plugin_textarea" style="font-size:25px;">'.$name.'</p>';
			}
			
			echo $after_widget; 
	}
	
}

add_action('widgets_init', create_function('', 'return register_widget("mwp_wid");'));

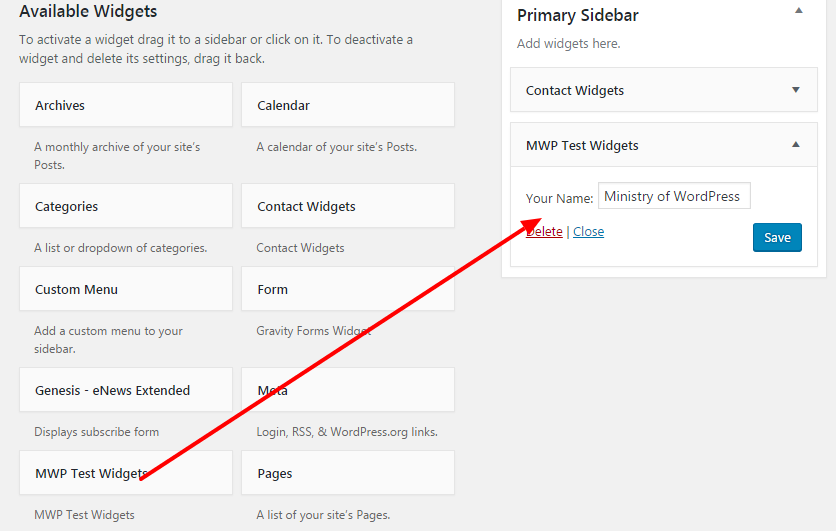
After adding these codes, you will see the widget in Dashboard > Appearance > Widgets. Now, add this widget in any widget area.

build-wordpress-widget

As I added this widget in the sidebar area, you can see the “name” in the sidebar. It’s just a simple example. I am going to explain the codes now.

wordpress widget in sidebar

Code Explanation

To create a WordPress widget, you need to extend WP_widget and its functions. You will see more about Widget API here. In the above codes, I used PHP inheritance class techniques. There are 3 functions in the class to make a widget. WordPress functions Form(), update() and widget() are generally used for Widget. So, let’s see what we used and why.

class mwp_wid extends WP_Widget{
	
	function mwp_wid(){
		parent::WP_Widget(false, $name = "MWP Test Widgets");
	}
......

As I said you need to use inheritance class to create widget within. A class name/ID called mwp_wid just extends WordPress default WP_Widget. Then you need to add a constructor mwp_wid() that must be the same name as the class name. In this constructor function, Widgets name can be defined.

function form($instance){
		
		
		$name = esc_attr($instance['name']);
		?>
		
	    <p>

        <label for="<?php echo $this->get_field_id('name'); ?>"><?php _e('Your Name:'); ?></label>

        <input id="<?php echo $this->get_field_id('name'); ?>" name="<?php echo $this->get_field_name('name'); ?>" type="text" value="<?php echo $name; ?>" />

	    </p> 
		
		<?php
		
	}

The form() function will let you add the elements that you want to show in Widget body. It can be form, text, links whatever. You need to use a predefined function called form() that create the widget in the WordPress administration.

function update($new_instance,$old_instance){
		
		$instance = $old_instance;
		$instance['name'] = strip_tags($new_instance['name']);
		
		return $instance;
	}

The update() function should check that $new_instance is set correctly. The newly-calculated value of $instance should be returned. If false is returned, the instance won’t be saved/updated. When you click on the widget form “save” button, then predefiend widget() function is called. Then it overrides previous value with new one.

function widget($args, $instance) {
		
			extract( $args );

			// these are the widget options
			$name = $instance['name'];
			
			
			echo $before_widget;

			
			// Check if options are set
			
			if( $name ) {
				echo '<p class="wp_widget_plugin_textarea" style="font-size:25px;">'.$name.'</p>';
			}
			
			echo $after_widget; 
	}

The widget() function echos widget content. This function contains two parameters $args and $instance. The $args is an associative array that will be passed as a first argument to every active widget callback. The $instance just instances its variable.

add_action('widgets_init', create_function('', 'return register_widget("mwp_wid");'));

Now, it’s the way to register widget. register_widget() function will let you do that.

Check out these codes in Git

Conclusion

In this WordPress widget tutorial, I have just worked on one field ‘name’. You can extend adding some extra fields as your wish to create a custom widget.

How to add WordPress Meta Box – 3 easy steps for Developers

What is WordPress Meta Box?

WordPress meta box is the option where you can put special information i.e. Post reference URL, Author name, Guest blogger name etc. Meta box can be a bunch of text box or text area or image uploading option. In a nutshell, meta box lets you enter or choose extra info on post types like post, page or custom post types. See the image below for clear concept.
wordpress meta box

Why we need it?

Say, you need to show your Guest blogger information on the post. Every time want to edit main post body? Of course not. There is easy an option to show data using WordPress meta box. Luckily, WordPress has a function called add_meta_box, it will let you register your desired meta box on post types. So, let’s see how can we add it.

How to add WordPress Meta Box?

There are 3 steps to add meta box. First, register the box, then execute the callback function adding box HTML code or whatever. At the last, save the meta box data. WordPress add_meta_box function is the initialization of the meta box. It has few parameters –

1. Meta box ID
2. Title of the meta box
3. Callback function that fills the box with the desired content. It will echo the meta box data.
4. The Post Types where you want to show meta box i.e. post, page, custom post types. See how to make custom post types.
5. The context within the screen where the boxes should display. Example: ‘normal’, ‘side’, and ‘advanced’. Side means meta box shows on the side of Post edit screen.
6. Priority. The priority within the context where the boxes should show ‘high’ ‘low’.

Now, write some codes for the add_meta_box function. Let’s say we want to show Guest write details. Like their name and website address.

Add these codes in functions.php

function add_guest_details() {
	
  add_meta_box('guest-details', 'Guest details', 'guestcallback', 'post', 'side', 'high');
  
}

add_action('add_meta_boxes', 'add_guest_details');

meta box registration is done. Now add meta box contents in the callback. So that it can echo the contents.

function guestcallback($post) {
	
	  wp_nonce_field( 'guest_meta_box', 'guest_nonce' );
	 
	  $name_value = get_post_meta( $post->ID, '_guest_name', true );
	  $link_value = get_post_meta( $post->ID, '_guest_link', true );
	 
	  echo '<label for="guest-name">'. 'Guest Blogger Name' .'</label>';
	  echo '<input type="text" id="guest-name" name="guest_name" placeholder="Example" value="'.$name_value.'" size="25"/>';
	  echo '<p class="howto">'. 'Add the name of the Guest' .'</p>';
	 
	  echo '<label for="guest-link">'. 'Guest website Link' .'</label>';
	  echo '<input type="text" id="guest-link" name="guest_link" placeholder="http://www.example.com/" value="'.$link_value.'" size="25"/>';
	  echo '<p class="howto">'. 'Add the link of the website' .'</p>';
  
}

We add two meta box contents. In the get_post_meta function, we need to add first the wp_nonce_field to prevent CSRF attack when form submitted. It’s very important, remember. The get_post_meta is used to retrieve meta data from the database.

Now, we need to save the data from the meta box when submitted.

function save_guest( $post_id ) {
	
	if ( ! current_user_can( 'edit_post', $post_id ) ) {
		return;
	}

	if ( ! isset( $_POST['guest_nonce'] ) ) {
		return;
	}

	if ( ! wp_verify_nonce( $_POST['guest_nonce'], 'guest_meta_box' ) ) {
		return;
	}
   
   if ( defined( 'DOING_AUTOSAVE' ) && DOING_AUTOSAVE ) {
		return;
	}

	if ( ! isset( $_POST['guest_name'] ) || ! isset( $_POST['guest_link'] ) ) {
		return;
	}

	$guest_name = sanitize_text_field( $_POST['guest_name'] );
	$guest_link = sanitize_text_field( $_POST['guest_link'] );

	update_post_meta( $post_id, '_guest_name', $guest_name );
	update_post_meta( $post_id, '_guest_link', $guest_link );

}

add_action( 'save_post', 'save_guest' );

The save_post hook’s callback is triggered when a post, page and custom post type is saved. We need to verify the nonce. If the nonce is invalid, then there’s problem in the callback. We also can define user permission to save meta data. Also we can check post auto saved or not. If the save is auto saved, then we return the callback. We need to retrieve the values of the form fields using PHP $_POST variable and save them in database using update_post_meta.

How to show meta box value in the post type template?

After registering and saving the meta box and its value. We need to show its value in the post types template like single.php or page.php or anywhere else.

Just add these codes in single.php as we are working on the post meta box.

$name_value = get_post_meta( $post->ID, '_guest_name', true );
				    $link_value = get_post_meta( $post->ID, '_guest_link', true );
				    echo ''.$name_value.'<br/>'; 
					echo $link_value;

Done. Now the Guest blogger name and web site address will be showing under the post content. You can CSS to make it looking good.

A detailed guide for WordPress Custom Post Types

What is WordPress Custom Post Types?

According to WordPress Codex, “Custom post types are new post types you can create. A custom post type can be added to WordPress via the register_post_type() function. This function allows you to define a new post type by its labels, supported features, availability and other specifics.”   

WordPress custom post types can perform along with WordPress’s default post types like Post, Page, Attachment etc. To create it, you need register post types. It depends on you how many types you need.

Why you need it?

Suppose your site is a portfolio website. You want to publish your works.  Default post types are so cliche for the data input. That’s why WordPress let you create custom types. You can also create taxonomy, Tags, Category, Meta box as your wish.

How to create CPT?

First, add this code in functions.php

// register custom post type to work with
function portfolio_post_type() {
	// set up labels
	$labels = array(
 		'name' => 'Portfolios',
    	'singular_name' => 'Portfolio',
    	'add_new' => 'Add New Portfolio',
    	'add_new_item' => 'Add New Portfolio',
    	'edit_item' => 'Edit Portfolio',
    	'new_item' => 'New Portfolio',
    	'all_items' => 'All Portfolios',
    	'view_item' => 'View Portfolio',
    	'search_items' => 'Search Portfolio',
    	'not_found' =>  'No Portfolios Found',
    	'not_found_in_trash' => 'No Portfolios found in Trash', 
    	'parent_item_colon' => '',
    	'menu_name' => 'Portfolios',
    );
    //register post type
	register_post_type( 'portfolio', array(
		'labels' => $labels,
		'has_archive' => true,
 		'public' => true,
		'supports' => array( 'title','thumbnail' ),
		'exclude_from_search' => false,
		'capability_type' => 'post',
		'rewrite' => array( 'slug' => 'portfolios' ),
		)
	);
	
}
add_action( 'init', 'portfolio_post_type' );

This snippet means the initialization of post types. At first, you need to add labels i.e. “Add portfolio” “Edit portfolio” etc. It totally depends on you. After labeling, now you need to register your post types. In above codes,  register_post_type() function allows you to define a new post type by its labels, supported features, availability and other specifics. We already defined the labels outside the function, though.

Now the Post Types options are showed in WordPress Dashboard.

wordpress custom post types

Click on the “add new portfolio”, then you will see the custom post types with the fields. The supports argument  ‘supports’ => array( ‘title’,’thumbnail’ )  will let you show what fields you want to show. In this example, I disabled WordPress editor.

custom post types interface

You may notice that there are extra two fields “portfolio Type”  and “portfolio link”. They are custom post types taxonomy. See below codes to how it works. The register_taxonomy function can take arguments to set label, slug most importantly.


add_action('init', 'portfolio_type');

function portfolio_type()
{
register_taxonomy(
'portfolio-type',
['portfolio'],
array(
'label' => __('Portfolio Type'),
'rewrite' => array('slug' => 'portfolio-type'),
'hierarchical' => false,
'show_tagcloud' => true,

)
);
}
add_action('init', 'portfolio_link');

function portfolio_link()
{
register_taxonomy(
'portfolio-link',
['portfolio'],
array(
'label' => __('Portfolio Link'),
'rewrite' => array('slug' => 'portfolio-link'),
'hierarchical' => false,
'show_tagcloud' => true,

)
);
}

To display taxonomy terms


function display_taxonomy_terms($post_type, $display = false) {
global $post;
$term_list = wp_get_post_terms($post->ID, $post_type, array('fields' => 'names'));

if($display == false) {
echo $term_list[0];
}elseif($display == 'return') {
return $term_list[0];
}
}

How to display custom post types in template?

Luckily, the WordPress theme system supports custom templates to display single posts belonging to a custom post type. Just like in the same way single posts and their archives can be displayed using the single.php and archive.php template files, respectively. Single posts of a custom post type will use single-{post_type}.php and their archives will use archive-{post_type}.php and if you don’t have this post type archive page you can pass BLOG_URL?post_type={post_type} . So, single-portfolios.php and archive-portfolios.php will be the name in this instance. You may wonder how to make the custom template for portfolio archives. Here you go,

First, open a text editor and paste these codes. Name it archive-portfolios.php

<pre>$args = array( 'post_type' => 'portfolio', 'posts_per_page' => 10 );
$loop = new WP_Query( $args );
while ( $loop->have_posts() ) : $loop->the_post();
  the_title();
  echo '<div class="entry-content">';
  the_content();
  echo '</div>';
endwhile;</pre>

Then it will show 10 portfolio items. If you are using custom taxonomies with your post type and would like them to display in your template file use the_terms().

Now, let’s create single post templates for the custom post types. Name it single-portfolios.php. Generally, WordPress show single templates by default for default or custom post types. So just copy the default single.php loops. Hope you understand.

Well, this is it. Build your own custom post types. best of luck!

How to deregister custom post types?

Add these codes in functions.php

<?php

function delete_post_type(){
    unregister_post_type( 'your_cpt_name' );
}
add_action('init','delete_post_type');

Just make sure you are using right custom post types name slug.

Well, you’ve learned about adding post types, showing it in a custom page or post and unregistering them easily. Let’s go for the big and complex practice.

Make themes woocommerce compatible

How to make themes woocommerce compatible?

Want to make themes woocommerce compatible? When you build WordPress themes from the scratch, generally WooCommerce support is not integrated. To integrate the Woocommerce function, you need to make some tweaks in your themes files. First, duplicate your page.php in themes. Rename it to woocommerce.php . Then open and remove the WordPress post/page loop by woocommerce loop. Probably your page.php codes are like…


<?php
 while ( have_posts() ) : the_post(); ?>
 <h2><?php the_title(); ?> </h2> <?php
 the_content();

 endwhile; // End of the loop.
 ?>

should be replaced by


<?php woocommerce_content(); ?>

If you see this technique is not working, then open Woocommerce plugins file, copy “templates” folder to your themes. Rename it to “woocommerce”.  Now your need to add CSS class manually to woocommerce defaults files. Just for an example, to compatible single products, open the folder single-products, now add your CSS class to  meta.php , price.php and others to make it as you wish.

It’d be better if you create woocommerce theme from scratch. Just make a blueprint before starting. Otherwise, this post may help you. If you need further help or want to make Woocommerce website, just contact here.