how to make multilingual site

How to make multilingual site easily?


You can make a multilingual website in WordPress using plugins in few steps. There are many plugins out there. Some are free and very notable like qTranslate.

  1. qTranslate X
  2. Polylang
  3. WPML [not free and the best one so far]
  4. xili-language

You can find them on WordPress Repo.

I am going to show you how to make multilingual site using qTranslate X plugins.

Step 1: Install qTranslate X plugins and activate it. 

Step 2: Go to plugin settings. You will see this in “General” tabs 


qtranslatex multilingual plugins


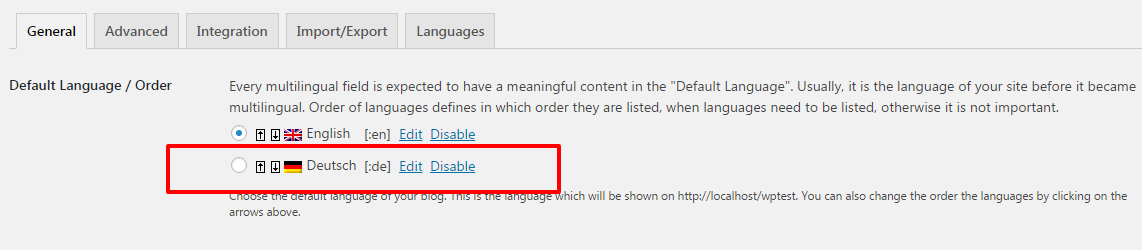
You can choose language here. To add a new language, follow the next step.

Step 3: Click on the “Language” tabs. You will see language list. 

Your language is not in the list? 

No problem. You can add new language on qTranslate X plugin.

Suppose, you are trying to add the Hindi language.

Click here to download the hindi .mo and .po file.

Download/Export all of them.


download .mo file


Download both .po and .mo and rename it in_IN.po and in_IN.mo, just an example. Have a look at the default German(DE) language example to get it clearly.

Now go to wp-content folder. You will see a folder called languages. Copy the all downloaded .mo file and paste there.

To get a clear concept of adding a new language. Just edit a language from the language tabs.


add a new language in wordpress


So the Hindi language setting will be


add new language in qtranslate x


And you are done.

Step 4:

Now go for creating a post or page. You will see language tabs up on the editor. Click on English language tabs and add English content. and do so for Hindi and other languages.

Conclusion:

You got the method. Now try on some test project on localhost.

How to Install WordPress Plugins Automatically and Manually

What is WordPress Plugins?

WordPress plugins are some piece of codes that give your site extra functionality. Generally, any custom functionality codes should be added to functions.php. But it won’t give you some on/off control over that functions. That’s why the plugins idea came up. So you need to create a plugins file and upload it. You can then activate it or deactivate it when you don’t need them.

Why do we need to add plugins?

As I said above paragraph that to gain control over the function concepts gear up the plugins idea. Suppose, you need to add a custom form for contact. You can simply add some meta box codes in functions.php. It could let down sites with some extra weights. Most importantly, you can’t get off/on control. That’s why you need to open a text editor, add some plugins header, then your codes for the custom form. Where you can add some backend control form that can be manageable from WordPress dashboard. So let’s see how to install plugins.

How to install WordPress Plugins?

Installing plugin is super easy. just go to WordPress Plugins Repository. Select a plugin and download. Now, go to your WordPress site Dashboard > Plugins > Add New > Upload plugins. Select the downloaded plugins from your computer. You can install plugins by searching as well. This is called “Add plugins Automatically”.

WordPress Plugins

Now, you can also install plugins through FTP or Cpanel. Using FTP client like Filezilla is also too easy. Just you need to locate the plugins folder file from the site directory. Then just drag and drop to the plugins folder. The directory hot link be like “your-site/wp-content/Plugins. This is called add plugins manually.

You can install plugin easily on your Localhost. If you are using WAMP or XAMP or MAMP in your computer, then just copy the unzipped plugins file to the wp-content/Plugins folder.

At the last, just activate the plugins. Done!

How to create plugins?

You may be wondering how to make a plugin. It is really advanced topics. But I can give you some basic concept.

Open a text editor. I like Notepad++ editor. Anyway, add some text with php tag.

<?php 

/*
Plugin Name: plugin-name
Plugin URI: http://yourpluginsite.com
Description: plugin description
Author: Name
Version: 1.0
Author URI: http://yoursite.com
*/

Save it and copy this PHP file to wp-content/plugins. Then go to Dashboard > Plugins, now you will see your plugins. Activate it. You are done. It is a just very first concept. You can read Plugins development here.

Conclusion:

Now you learn how to install plugins extensively and how to make plugins just in concept. You can also check how to install themes here.